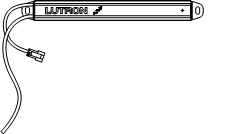
QS Wireless Receiver
|
QS Shade Button Diagram
|
QS Venetian Blind Button
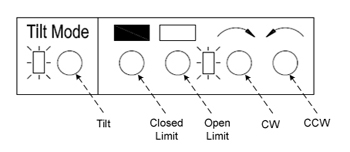
Diagram  Note: The "Tilt Mode" LED is not referenced below. This LED will turn ON when the commands generated by the main buttons (Closed Limit, Open Limit, CW, CCW) are affecting the "Tilt" module of the Blind OR when the main LED's feedback applies to the "Tilt" module of the Blind. The main LED's feedback will always follow the codes below. |
Quick Links
|
Note: All blink codes described belowoccur on both the EDU & the QS Wireless Receiver, unless specifically noted with EDU only or Wireless Receiver only.
Normal Operation
| LED | Description | LED Cycle | LED Blink Pattern |
 |
EDU only:Startup This occurs when the EDU powers up. If this happens when the EDU tries to start moving, this is an indication the motor is stalling and the EDU is resetting. Verify that the fabric/hembar is not caught. |
Red for 1/2s, green for 1/2s, blue for 1/2s, repeat 2 times. | 


Alternately blinking red/green/blue, 1/2s for each color. |
 |
Wireless Receiver only: Startup This occurs when the wireless receiver powers up. |
Red for 1/2s, green for 1/2s, repeat 3 times. |
|
 |
Operating normally. | Off | 
LEDs off |
 |
EDU only: The EDU is being moved from its local Clockwise or Counterclockwise buttons. | Constant on | 
A constant green LED |
Setting Limits Using Buttons on the EDU
| LED | Description | LED Cycle | LED Blink Pattern |
 |
EDU only: The EDU is in limit set mode. Tap the Open Limit or Close Limit button to leave limit set mode, or press and hold the open or close limit button to store current position as the open or close limit. | Constant on | 
A constant green LED |
 |
EDU only: The EDU is currently in process of storing this position as the open or close limit. | 1/8 second | 

A fast green blink (8 per second) for2 seconds |
Assigning (used in systems without a main repeater)
Description - Assigning is used to assign or unassign a control device from the wireless shade in systems without a main repeater. There are two assignment modes available.
1) Forward Assignment Mode - In this mode, the user starts the process at the control (Pico or seeTouch keypad), taps any button on the EDU, and completes the process back at the control.
HOW TO ENTER: Press & hold the "Open" & "Close" buttons on a control (Pico or seeTouch keypad) for 3s. The EDU & wireless receiver will show slowLED feedback if they are unassigned, or fast LED feedback if they are assigned. See below for details of these blink codes.
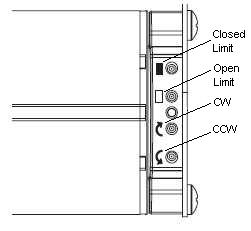
HOW TO EXIT: Press & hold the "Open" & "Close" buttons on a control (Pico or seeTouch keypad) for 3s. The EDU & wireless receiver will stop showing LED feedback.2) Reverse Assignment Mode - This mode starts at the EDU. The user puts the wireless shade into reverse assignment mode by holding the open limit (indicated with a white rectangle) button for 5s, then tapping the clockwise button. Then, to perform the assignment, they hold a button on the control (Pico or seeTouch keypad).
HOW TO ENTER: Press & hold the "Open Limit" button on the EDU that the wireless receiver is connected to. The LED on the EDU will blink quickly after 5s. Then, tap the "Clockwise" button. The LED on both the wireless receiver & the EDU will then begin to blink 2 times every 4s (shown below) indicating that they are in assignment mode.
HOW TO EXIT: The EDU & wireless receiver will automatically exit reverse assignment mode after being assigned to a control device. If you do not wish to assign any controls tothe wireless shade in assignment mode, you can exit the mode manually. To exit , press & hold the "Open Limit" button on the EDU for 5s. The LED on the EDU & wireless receiver will stop blinking to indicate both devices are operating normally & are no longer in assignment mode.
| LED | Description | Timing | LED Blink Pattern |
 |
The wireless shade is in assignment mode (either forward or reverse) & unassigned to the control. Note: If the LED goes out after trying to enter reverse assignment mode, the max number of assigned controls has been reached. |
4s | 


Two green blinks in 4s. |
 |
Thewireless shade is in forward assignment mode & assigned to the control. | 1/8 second | 
 Afast green blink (8 per second) for 3s. |
Addressing to a Main Repeater
| LED | Description | LED Cycle | LED Blink Pattern |
 |
Unaddressed. This device is in addressingmode and is unaddressed to themain repeater. | 4s | 


On for 3s, then off for 1s. |
 |
Addressed. This device is in addressing mode and is addressed to the main repeater. | 1s | 

1/2s on, 1/2s off. |
 |
Trying to address. When the wireless shade is in addressing mode & any button is held down on the EDU, the wireless shade will request to be addressed by the main repeater. This fast blink should stop after 3s & begin showing the "Addressed" feedback described just above. | 1/8 second | 

A fast green blink (8 per second) for 3s. |
Programming in a Main Repeater System
| LED | Description | LED Cycle | LED Blink Pattern |
 |
Unassigned. This device is in programming mode and is unassigned to thecontrol device that was used to enter programming mode (ex: Pico, seeTouch keypad, VCRX). | 10s | 


2 green blinks every 10s. |
 |
Assigned. This device is in programming mode and is assigned to the control device that was used to enter programming mode (ex: Pico, seeTouch keypad, VCRX). | 1s | 
 1/2s on, 1/2s off. |
OS Updating
| LED | Description | LED Cycle | LED Blink Pattern |
 |
Wireless Receiver only: In OS update mode & receiving data. | Constant on |  |
 |
Wireless Receiver only: In OS update mode, but not receiving data. Note: The wireless receiver doesn't always receive data while OS uploading, so seeing this during the upload doesn't imply that there is an error. If this blink code continues after the OS upload finishes, however, then the wireless receiver did not properly update. To fix this, verify that RF range between the main repeater & the wireless receiver is acceptable, and try again. |
1s | 

1/2s on, 1/2s off. |
 |
EDU only: In OS update mode & receiving data. | Constant on |  |
 |
EDU only: In OS update mode, but not receiving data. Note: The EDU doesn't always receive data while OS uploading, so seeing this during the upload doesn't imply that there is an error. If this blink code continues after the OS upload finishes, however, then the EDU did not properly update. To fix this, verify that RF range between themain repeater& the wireless receiver is acceptable, and try again. |
1s | 
 1/2s on, 1/2s off. |
Return to Defaults
Note:Returning an EDU to its default settings ("out-of-box") will NOT affect the EDU's limits.
| LED | Description | LED Cycle | LED Blink Pattern |
 |
Step 1 First, press and hold the Close Limit button for 5 seconds. The EDU will blink for 2 seconds, and then turn solid green. |
1/8 second | 

A fast green blink (8 per second) for 2 seconds. |
 |
Step 2 Next, press and hold the Open Limit button for 5 seconds. The EDU will blink for 2 seconds, and then turn solid green. |
1/8 second | 

A fast green blink (8 per second) for 2 seconds. |
 |
Step 3 Next, press and hold the CW button for 5 seconds. The EDU will blink for 2 seconds, and then turn solid green. |
1/8 second | 

A fast green blink (8 per second) for 2 seconds. |
|
Step 4 - EDU only Finally, press and hold the CCW button for 5 seconds. The EDU will turn solid blue while it defaults its settings, and then the EDU will automatically restart. |
Constant on | 
A blue LED for a few seconds, and then the EDU will restart. |
|
Step 4 -Wireless Receiveronly When step 4 is completed on the EDU by pressing & holding theCCW button for 5 seconds,the wireless receiverwill turn solid red while it defaults its settings, and then the wireless receiver will automatically restart. |
Constant on | 
A redLED for a few seconds, and then the wireless receiver will restart. |
Fault Conditions
| LED | Description | LED Cycle | LED Blink Pattern |

|
EDU only: Temperature overheated / maximum runtime exceeded Wait 20 minutes before attempting to move the EDU. |
8 seconds | 


Four red blinks in 8 seconds |
 |
EDU only: Ensure the shade's fabric or hembar is not caught or hung up. The EDU will blink like this for 30 seconds when it stops abruptly. |
1/8 second | 

A fast red blink (8 per second) for 30 seconds. |
 |
EDU only: Open and Close limits need to be set | 1/2 second | 


Two quick blinks, twice a second |
 |
Wiring problem / device not able to communicate | Constant on | 
A constant red LED |
 |
EDU only: A power supply problem occurred, such as AC input voltage being detected or low supply voltage. Check power wiring. | 1/8 second | 

A fast blue blink (8 per second) for 30 seconds. |
 |
Wireless Reciever only: Wrong number of shades connected to wireless receiver. The wireless receiver has detected that there is either no shade or more than one shade connected to it. | 1/8 second | 

A fast red blink (8 per second) |
 |
Wireless Receiver only: Invalid serial number. | 2seconds | 

Cycles between red & green, 1s for each. |


